Wednesday, July 12, 2006

Destickerfication step 2.5

Tonight I rearranged the garage and backed in the Seca ("say-kuh") in preparation to remove the other side decal. When I removed the first one (previous post) it left behind a layer of adhesive in the same shape as the entire decal. That part took a good 20 minutes to remove.

I started at the tip at the rear of the bike and low and behold, this sumbitch came right off without leaving so much as a square inch of adhesive. Hmmm..what next? I know my buddy wants all the decals removed, but I think the bike might look ok if the "Seca II" logo remained without the, uh, garish colored background graphic.

Pulled out a fresh razor blade (no not a Razor blade) and went to work. I purchased a 100 pack of blades some time ago and I tell ya, they're super handy to have around. I carefully traced around the bottom portion of the text making sure not to push super hard. I knew that if I pressed too hard, I might leave some scratches in the plastic that would show up if the remaining decal was removed. What you see below is the result. See previous posts for what it used to look like. Not too shabby if I do say so myself....


Wednesday, July 05, 2006

De-stickerfication step 2, and some tuning...


I couldn't take it anymore - that blue & purple stripe had to go! And voila, the result is what you see above. It came off in one piece too, amazing.

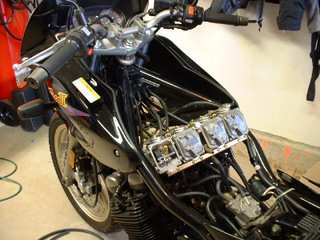
Also worked on trying to get the beast running smoother. It seems to have a hesistation right off of idle. I must have pulled the gas tank 4 or 5 times between yesterday and today to make minor adjustments to the carbs.

I think I'm on the right track - but I'm still frustrated only because I KNOW the tank will be coming off another few times before I'm done.

Yesterday I had a little fun - my friend Rich and I blasted up to Lake Geneva on some back roads. Weather was perfect and so was the ride. He knows a great way to get there and we only have to deal with a minimum of other traffic. For the first time I got my bike up to an indicated buck forty...heh. Good stuff......

Sunday, July 02, 2006

De-stickerfication step 1


What can I say - I was feeling a little motivated today even though it's pretty humid outside.

First step of the sticker removal was to get rid of the three warning decals on the gas tank & upper fairing. I couldn't take looking at all that purple and pink any longer so I started on the graphics too. For the fact that they were the smallest, I did the ones on the bellypan first. They actually came off quite easily and the adhesive came off even easier. Here are a couple of before & after pics.


Project Seca continues...


Well, I didn't waste any time. The day I got the bike (8 days ago) I popped open the carbs to see what's what. A few weeks back when I first saw the bike, we got it fired but it ran like crap... so I knew it shouldn't take too much to get it running right.

I found that a couple of the pilot jets were completely clogged. I couldn't even clean them with compressed air, I needed to jam a thin wire through to clean it out.

I put it all back together, crossed my fingers, engaged the choke and pressed the starter. Success! Well kinda..... it was running, but even after a few minutes of warming up, the engine would die if I gave it any gas. Ugh... oh well.

I guess I'd have to pull the carbs afterall. No biggie - it's been done before on my own bike. Ha ha ha... boy was I wrong. After figuring out how to disconnect the throttle cables and get the carbs on the bench, I managed to strip three screws. I'm convinced that they were made of a material weaker than styrofoam. Thankfully my Dremel came to the rescue and I was able to cut the screws off.

The spark plugs were replaced and the bike was buttoned back up. This is it... moment of truth.
Choke engaged, fuel turned on, and..... nothing. At this point the battery didn't have enough juice left to get it started. I knew it'd take a good amount of cranking because the whole fuel system was dry.

Sean let me borrow his battery charger so I could get it charged back up. After about 30 minutes of charging and adding a little more gas in the tank, it now runs. YESSS! Like a little kid I was anxious to take it out for a quick spin. I quickly bolted down the gas tank and cleared a path to get the bike out of the garage. Feels a bit short on power, so I think I'm going to work on some tweaking.. then again, this bike only has about 1/2 the horsepower and 1/3 the torque of my own bike.

Next step - removing the garish decals........

Saturday, July 01, 2006

New bike - needs some TLC


One week ago I picked up a motorcycle for my friend. It was a pretty good deal and the bike is almost new. Well - it's a 1996 Yamaha Seca II, so I guess ten years old isn't exactly new. But, this forgotten set of wheels only has 916 original miles. You can see in the photo that the paint is still shiny and overall the bike is pretty clean.

Knowing that my best friend was in dire need of inexpensive, reliable transportation I figured this would be a perfect fit. After showing him some photos and doing a little research on this model (to see if it'd be worthy of his needs) I told him I would buy it for him and get it going - and that it could pay me pack. I fronted about 2/3 of the money for it and the wife knew that if the bike was going to anyone but him, we wouldn't have done it.

I love tinkering on this stuff and since I have the room and the time I told him it would be my pleasure to get this bike running.

Oh - and the bonus.... he's not taking delivery until September most likely so I'll have plenty of time to tinker and have some fun with this thing.